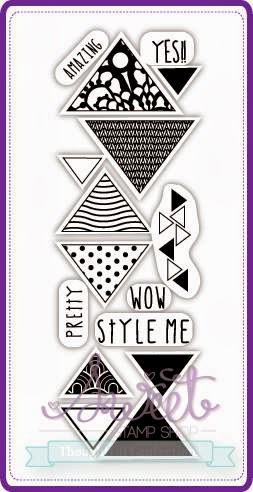
Showing posts with label Triangle Style. Show all posts

Oct 22, 2013

Double Take | Using a Sketch

Hi! It's Michelle here, and for today's Double Take, I will be using a sketch to create the following layout and card. :)


If you've never used a sketch before, I highly recommend trying it out. It's great for beginners to give you a place to start, but it's also great for more advanced crafters because it can challenge you to do something you might not have thought of. AND, since we're doing a double take here, there's also the bonus of giving you a general layout for BOTH a layout and card, so you can get two projects done at once!! I made my own sketches for these projects - using one general layout, but changing it up as needed (sentiment for a card, but title for a layout; focal point for a card, but photos for a layout, etc.) Here is what they look like:
You might be able to tell from the sketch that I won't be doing a traditional 12x12 layout today, which is the norm for me. Instead, I thought I'd give an 8x5x11 layout a try, especially since the proportions are so much closer to a standard card size. If you wanted to translate the sketch into a 12x12 layout, you can, of course!!

So let's get started on the layout... First, I took a white piece of cardstock and started cutting some triangles out with my craft knife. I wanted to create a confetti-like effect, kind of like the triangles were falling from the top of the page. I backed each cut triangle with little scraps of patterned paper. After that was done, I wanted just a bit more dimension, so I stamped some Triangle Style stamps onto vellum, cut them out, and sprinkled those around as well.


Then I started creating the diagonal stripe across the page. I took a few pieces of patterned paper strips (scraps, branding strips, and washi tape are perfect for this - use up that stash!!) You can see that I also stamped a really fun border using another stamp from Triangle Style. After that, I placed my photos down and layered a bunch of embellishments and stickers from my stash. You can see in the picture below that I used yet another DIY die cut embellishment that I premade. I think my absolute favorite way to use them at the moment is spraying them with Gold Color Shine. LOVE that little bit of shimmer it adds!!


The next step was to add my title. I decided to do some fun calligraphy for my title, and then I made it into a cut file for my Cameo. If you want to download it, I'm sharing the SVG file on my blog!


Finally, I added my journaling (which there was a lot of this time) and some splashes of gold mist, and my layout was complete!


For my card, I decided I wanted to do the same triangle border as my layout, because it came out so beautifully. Again, I took some paper strips from my desk and made that diagonal line. Super simple and easy. I also embossed a sentiment from Super Mom onto one of the strips.


Since I had that stamp set out, I decided to make my focal point using it, too. I stamped the "Mom" stamp, and then that great explosion stamp (using another "Mom" stamp that I cut out and used as a mask)

I decided not to use little triangle confetti pieces for this card, but some circular elements instead. That's another great thing about sketches - they're open for interpretation, and you can change whatever you want as you go along!! I used some enamel dots and sequins, but some other great ideas are gems or stamping the sequin stamps from Easily Distracted. That was all that was needed as the final touch to my card!


Here are the stamp sets I used in my projects:


I hope these projects have inspired you to use a sketch (maybe even the ones I made!) on your next project... or maybe you're inspired to do TWO projects at once using the same supplies. Either way, I would LOVE to see what you make, so leave a comment with a link to it in this post.

Just in case you missed the October release, make sure to check out the post here where there is tons of inspiration from the fabulous design team showing you just a few ways to use the new, versatile, AMAZING sets!! And if you haven't checked out the new flair in the shop, you really MUST - they are so cute. Here's a little peek at one of my favorite sets, which I think it super trendy:


:) Michelle Pin It

Oct 21, 2013

SSS- Finding Multiple Uses from one stamp


Are you ready for another Sweet Stamp Shop tutorial? I hope so! But today, might be more of a tip...

Thinking outside of the original stamp image!

There are some stamps that can be transformed into a number of different images
 besides the intended image! 

Want an example?  
Take a look at this bomb stamp from the Sweet Stamp Shop's Super Mom stamp set:


If you turn the bomb upside down and cut off the spark/line, you can turn it into a balloon!


Do you see another example on the card above?

From the Triangle Style stamp set, I turned the word 'WOW' into 'MOM' for the sentiment of this card!


Take a look around the Sweet Stamp Shop store and see if you see any other stamps that can be altered in a different image. We would love to hear what you come up with! Please leave a comment on this post with your amazing idea!

Also used in today's card:


Have a SWEET day!

Jessi from Kissin' Krafts
Pin It

Oct 11, 2013

Designer Spotlight #3

Hello, my sweet friends!  It's Judy here with my next installment of "Designer Spotlight!"

Today I have the pleasure of introducing Kim Singdahlsen and her blog, Joyful Creations with Kim.  Welcome to the Sweet Stamp Shop, Kim!  I have admired Kim's amazing card-making skills for some time, and I'm guessing many of you are familiar with her work, too.  After all, she currently serves on three Design Teams including CAS(E) This Sketch, Curtain Call, and Catered Crop.  She has served on many other design teams at some point as well, and I can't even count how many Guest Designer spots she has done!  (Today we add another one to her list!)  You really need to check out her blog HERE...you'll see why I admire her so much!

So, Kim was not only willing to share some cards with us today but she also entertained a few questions for all of our readers.

First up...her amazing cards!  Kim had two sets to play with (seen below) and she really displays her skills in making amazingly clean and simple designs...check it out!


But wait, there is more!


And yet another!  (My guess is that somebody had a very busy World Card Making Day!!!)


All this amazingness with two sets of stamps!  Here is what Kim had to play with when making her cards:


Amazing, right?!  Next up...my interview with Kim.  Here is what I thought we all might like to know:

Q:  On average, how many cards do you make in one week?

A:  Currently, I average 7 cards a week.  I try to create a card and post it each and every day mainly to force myself to sit down and unwind at my craft table even on busy days.  In my real life, I am surrounded by men and boys, and I am a full-time college student getting my second degree in accounting.  Being surrounded by men and by numbers, there is nothing better than spending some time surrounded by stamps and patterns and sequins!!


Q:  What is your favorite stamping technique?

A:  There are many techniques that I love and use regularly - as long as they fit into a clean and simple style!  I love to color.  I am by no means an artist, but coloring with my Copics does take me back to my childhood!!  I love the look of paper-piecing and it can often add a special touch to a clean card.  I love white heat-embossed images on colored paper. And I'm not at all against using heat-and-stick powder and glitter all over a panel or an image!  Just due to my style, there are a number of techniques and coloring mediums that I don't tend to use - but I certainly admire them on other crafter's cards!


Q:  Do you have any advice for beginning stampers?

A:   I have two pieces of advice for beginning stampers.  (1) Play along with challenge blogs even if you are not sure you are ready.  They are the best place to learn and to grow in your own crafting.  You get ideas for color combinations.  You see new ways to lay out your card.  Be sure to study the design team cards to see how they have used the challenge in creative ways.  I've been doing this for well over a decade and I still learn from studying other cards!  (2) If you like a certain companies' products, stick with them.  It's very tempting to buy every stamp that you see and like, but it is so much easier in the long run to build a collection from a few companies.  Their stamps will work together so it's very easy to use a border from one set, an image from another and a sentiment from a third.

-----

I have to agree with that advice, Kim.  (And might I suggest that Sweet Stamp Shop stamps would be a great company to go to in order to build your stamp collection?!)

So, my sweet friends, let's give Kim a big shout out of THANKS for letting us spotlight her as one amazing designer!  Be sure to visit her blog for some amazing inspiration, and stop by my blog for a flat-out CASE of one of Kim's cards using my Sweet Stamp Shop stamps!


We are preparing for our October stamp release coming on October 16th...be sure to check it out, I promise you will not be disappointed!  Details can be found at our Facebook Events Page.  


Have a sweet day, friends!
Judy
Pin It

Oct 10, 2013

Triple Sweet Thursday - 10 Minute Craft Dash

Hey everyone!

Happy Thursday sweet friends! It's Alyssa here from My Thoughts Exactly with another Triple Sweet Thursday - 3 Cards, 3 Ways, 1 Challenge! As always I'll be spotlighting ONE challenge and rocking it THREE ways to get you inspired!

This week's featured challenge:


About the Challenge:
The 10 Minute Craft Dash is a color challenge with a TWIST: you must complete your card in under 10 minutes. A new challenge is posted every other Wednesday. Your entry must use the color palette and be completed in under 10 minutes. Though if you do go over 10 minutes you can still link up,  you just won't be eligible for the prize. An important note: you CAN plan and pull out your supplies prior  to starting the timer!


Why I Love This Challenge:
Do you LOVE color challenges but find yourself bored or not so challenged by them from time to time? If so, The 10 Minute Craft Dash is for YOU! I love a good old color challenge, but I REALLY love the 10 minute twist! It's like the card makers work out. Sometimes I find myself spending HOURS on one card. That's ok every now and then, but isn't great when you have several cards on your to do list. The 10 Minute Craft Dash really pushes you to get creative and just DO IT. Do it FAST.


The Current Challenge:


The current challenge called for the use of orange, black, and green. Perfect for Halloween right? But Halloween isn't the only way to rock this color palette!


3 Cards - 3 Ways -ONE Challenge

Way 1 : CAS


Time: 7 minutes and 2 seconds
For my first card I went the route I'm most comfortable with: CAS. I pulled out my Sweet Stamp Shop Triangle Style and Zombies stamp sets, an orange, a green, and a black ink pad, and some white paper. I started the timer and went to work creating my Halloween inspired triangle pattern. After scrambling to find some sequins to finish off my card, my stylish and simple Halloween card was finished in 7 minutes and 2 seconds!


Way 2 : a GUEST card by Danni!


Time: 7 minutes and 47 seconds
For card number two I brought in the help of my wonderful friend and Sweet Design Team coordinator Danni! It was super fun to do the dash with Danni and Nicole! Danni busted out this beautiful ombre card featuring the Sweet Stamp Shop Fall Gratitude stamp set in just 7 minutes and 47 seconds! I especially love the little gem accents. Thanks so much for your help Danni!!


Way 3 : More Involved


Time: 9 minutes and 38 seconds
Whew. This one was close. For my final card I challenged myself to step outside the halloween/fall box. I will admit a couple things: I stretched "orange" to a bit of a yellow to red spectrum, and see those green sequins? Yeah, those MIGHT have gone on after I stopped my timer and then realized I had no green, shhh. But I LOVE how this card turned out, and that's really what it's about isn't it? For this card I whipped out my Sweet Stamp Shop Super Mom stamp set, plus my watercolors and some clear acetate. Oh, and don't forget the sequin ;)


SSS Used in These Projects:


I'm looking for MORE challenges to feature right here on the SSS blog! What is YOUR favorite challenge to play along with? Leave me a comment and let me know!


Have you checked out the SSS Pinterest and Flickr pages?
There's TONS more fantastic inspiration on those pages so be sure to click and check them out!!


Before I go, DON'T FORGET the Sweet Stamp Shop October release is happening October 16th! You WON'T want to miss this one!!


Big bloggy hugs <3
Alyssa

Pin It

Sep 27, 2013

Double Take - DIY Chipboard Embellishments

Hey sweet readers! It’s Michelle Y. here today, and I am SO excited to present the next installment of Double Take, where I make both a scrapbooking layout and a card using a similar theme. Today I will be showing you how to make your very own chipboard embellishments and how I made my two projects below!!!


Making my own embellishments is something that I love doing very often, because it’s a fun way to do something creative when I don’t feel like starting a whole big project. And also, let’s face it, pre-made embellishments can be quite pricey, and sometimes I just want to use some basic supplies and some Sweet stamps and get a similar effect for much cheaper!!

Okay, so when I said I was making my own chipboard embellishments, I didn’t mean the super thick, layered kind of chipboard. I’m thinking more along the lines of some thin cardboard (NOT corrugated), like an old cereal box. One, it is easier to cut and work with, and two, I can layer tons of these embellishments later and my project won’t be too bulky. I’m SURE you have some old packaging or cereal boxes, so hop on over to my blog where I will have the full tutorial of how to make these beautiful little pieces (I’ll also be sharing the cut file I made and used, if you wanted to use that, too!):


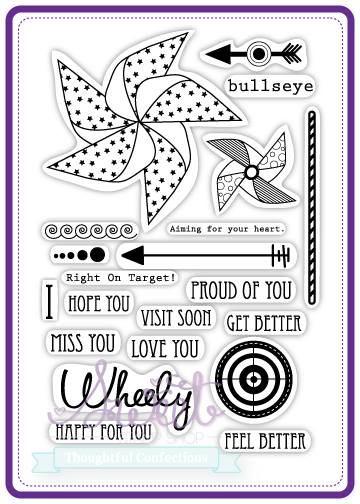
You can make these with just some basic supplies and a few Sweet stamp sets (I used Triangle Style and Wheely Like you), and it is SO much more rewarding to use on a project because it makes everything so much more handmade!! In addition to these chipboard embellishments, I made some super simple paper leaves, just cutting them out freehand and then adding either machine stitching or some watercolor accents.


I layered all my goodies up on my layout, and here is what I was finished with:


I didn’t need to use many other embellishments, since I used so many of my own – this is a super economical approach if you LOVE having tons of layers like me, but it’s just not in the budget to buy multiple packs of various coordinating embellishments.

Of course, since I made so many embellishment pieces at a time, I had some extra bits that I put to good use on a card.


I added a sentiment from Wheely Like You and the card was complete!

Here are the stamp sets I used for my projects:


I hope you enjoyed this episode of “Double Take” and I hope you’re inspired to make some of your own embellishments! Make sure to send me a link in the comments if you do, because I’d love to check out what you come up with!!! It would also be a great opportunity to enter into this week's Use What You Have challenge, which just started a few days ago!


And remember, we're having an AWESOME sale in preparation for Halloween... grab those stamps before it's over!!

Until next time, keep crafting SWEET things!!

-Michelle Y.
Pin It

Sep 23, 2013

Designer Spotlight #2


Hello, sweet friends!  It's Judy and I'm back again with my second segment of "Designer Spotlight" at the Sweet Stamp Shop! 


My PhotoThis time I have the honor of spotlighting the super talented queen of clean and simple: Maureen Merritt!  Maureen's blog, Mama Mo's Stamps, is one of my favorite stops in blog land...it reads like a favorite magazine and is always full of inspiration!  Not only has she been a winner in pretty much EVERY card challenge known to stampers, but she has also been published multiple times in both CARDS and Paper Crafts Magazine.  This past August, Maureen was featured as a Moxie Fabber of the Week because, indeed, she is moxie fab!  You can check out those details HERE. 
Maureen graciously agreed to share her talents with us here at the Sweet Stamp Shop.  Her card demonstrates exactly why she deserves to be in the spotlight...check it out!


Wow, this IS amazing, indeed!
Here are the stamp sets Maureen used:
Image 1

Image 1

Maureen was also gracious enough to answer a few questions for me and the readers here at the Sweet Stamp Shop.  Here is what inquiring minds wanted to know:
Q:  On average, how many cards do you make in a week?
A:  I'd say that I make about 5-7 cards per week. I'd love to make more and get inky every day, but sometimes life just gets in the way! Apparently my family prefers to wear clean clothes and eat dinner rather than have me stamp daily :)   If I get in a card a day, I'm happy.
Q:  How do you approach the card-making process...do you wing it or do you like to follow sketches, color cues, challenges, etc.?
A:  Each stamp session is different. There are times that I head to my desk with a specific challenge in mind, other times I wing it. I mostly have an idea about a stamp set I'd like to use or a color combo, but it doesn't always work out.  My beginning point is always so much different than my end result!
Q: Do you have any bits of advice for beginner stampers?
A:  You don't need to have it all. There are so many products out there that it gets overwhelming. I know, I've been there. You really only need the basics...paper, ink, stamps and a paper trimmer. I find that my favorite cards are the ones that just use just stamps and ink. Play with different techniques to make the most of the supplies you have!
And THAT, my friends, is the best advice...ever!  Her card above is proof of that...a one-layer masterpiece using nothing but stamps and ink!
Thank you, Maureen, for sharing your time and talents with us...you are so sweet!

Hop on over to my blog HERE to see the card I made inspired by one of Maureen's cards.  Here's a little sneak peek!

Remember...the September release stamps are still available at the Sweet Stamp SHOP.  Be sure to follow us at our Facebook page, too! 

Have a sweet day!
Judy
Pin It

Sep 22, 2013

Just Add Ink: Big Pattern, Small Scale

Hi It's Tyra and I'm here to share how to use your stamps to create big pattern on a small scale.

I love the idea of creating patterned paper using stamps, however I am just not good at getting the end result looking anything close to symmetrical or just pleasing to the eye when I stamp over a large surface.  I find that stamping onto die cut shapes or any smaller scale blank shape removes the concern of stamping precisely across a large surface area.

Let's jump right into an example.  I am going to use a card I previously created as the inspiration piece:


I like the balance of elements in this card so I used the same die cut shapes and stamps from Color Wheel and Triangle Style to create my own patterned paper.


This is the card I created using my custom embellishments:


This technique is a great way to make your own custom card and memory keeping embellishments. 

 So get out some blank paper and your die cutter, nesting dies or plain old scissors and create to your heart's delight! Share your creations on our Flickr page! Join our Facebook group and share your thoughts on creating big patterns on a small scale.  I think I'm off to punch and die cut everything in sight!

Pin It