Showing posts with label Technique. Show all posts

Oct 8, 2013

Triple Sweet - Nicole, Jessica, Michelle

HEY Sweet friends! Nicole here ... this is going to be a LONG post - I had a bit of a 'oops' moment and scheduled two ladies for the same day today... so, Jessica AND Michelle will be on today showing off their SWEETNESS! Hooray!


But, first - did you know that I help my good friend Corinna (owner of Ribbon Carousel - pictured above) with creating a card for her blog once a month - I suppose I might even say, I'm one of her 'designers' --- BLUSH! What a genuinely NICE person.... and I can't encourage you enough to support her and Ribbon Carousel... she's just so amazing.... today I'm on the Ribbon Carousel blog with a special 'sneak peek' of our October release... so head on over there and check it out!


__________________________


 Happy Tuesday, Sweet fans! It's Jessi here from Kissin' Krafts!  Are you ready fro another Tutorial Tuesday? Today we are talking Ombre stamping. I am in love with the Ombre technique.

Today's card uses Sweet Stamp Shop's Chalkboard Sign stamp set:


The Ombre technique is very simple to complete. The best way to apply the different color inks to the stamp is to go from light to dark. The first color I applied to the stamp was the light blue. The light green-blue ink is added above the light blue. The dark green and darker blue are added towards the end.


I wanted the Chalkboard Sign stamp to be the focus of the card, so I kept the design simple and stamped the image twice. The banners are cut out and adhered with foam dots to add dimension to the card.


Alright, Sweet Stamp Shop friends! I need your help! What are the latest trends that you would like to see us explore in upcoming tutorials? I cannot wait to hear your ideas!

 _________________________________


Hi Sweet fans! It’s Michelle Y. here today with one of my favorite parts of the month – Double Take!!! Today we are going to be focusing on a very basic and versatile shape – circles! I love being able to turn a simple shape into something awesome – it makes you think a little more creatively to find ways to use it!

I decided I wanted to make a confetti-like effect for my projects. And of course, since this is a Double Take, I wanted something that would work for both a layout and a card.


One of the best ways to get double duty out of your supplies and projects is to use BOTH the positive and negative shapes of die cuts/punches. I designed a fun background with circles, which you can download at my blog here, and cut it out of some watercolor paper that I had painted on very subtly. I thought it would be a perfect opportunity to use on top of that beautiful rainbow paper from Crate Paper, because it hides some of the busyness of all that color! I love this effect, because I looove color, but sometimes think it is too overwhelming for my pictures; this way, I get to see some of that lovely design, while still focusing on what’s important on the page.

After that was done, I went to work adding lots of layers under my photo and then going crazy with my Sweet stamps. I used sentiments from Triangle Style as well as Made By #2. My layout was about how I love to create things, and about the first skirt I sewed, so I couldn’t have thought of more perfect sentiments to go along with my story!!! Here are some close up shots of the page and the stamping and the final page

Oh, and those cardboard/chipboard stars - same, easy DIY concept as my last Double Take!


So after my layout was finished, I had a bunch of those circles left that had been die cut.


I thought they would be perfect just scattered on a background with a bold background. They kind of looked like bubbles, which I thought was really fun! To add more interest, since the watercoloring is very faint, I added some dashed lines and mounted some of the circles up on foam tape, making sure that the circle with the sentiment popped up the most.


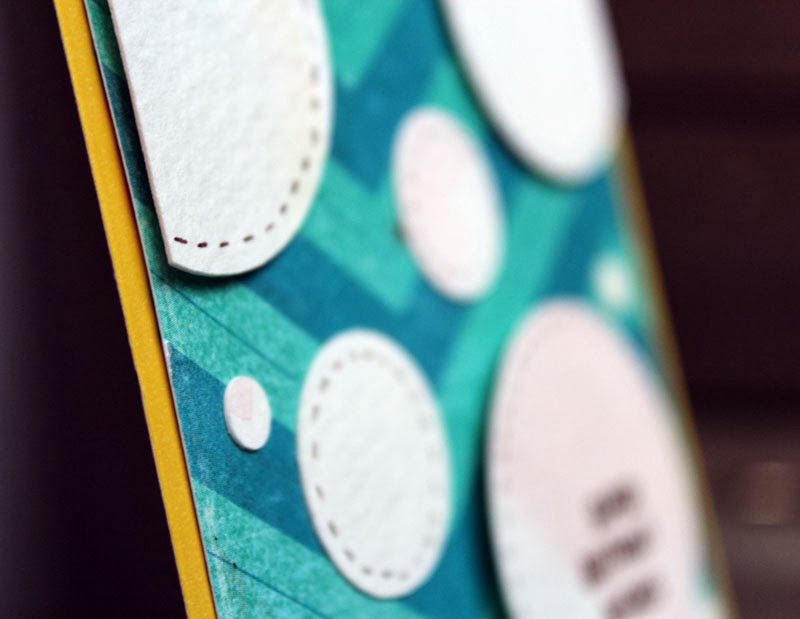
That was all I needed to make a fun, yet easy card with leftovers! Don’t you LOVE when that happens?? It’s like getting a bonus project from almost nothing!!


Here are the Sweet Stamps I used in these projects:


How will you use circles in your next project? Maybe you could make a garland of circles, or make a fun bokeh effect by stamping the super cute small sequins and circles in the Easily Distracted set… or try some fun confetti… the possibilities are endless! Be sure to link up a project using circles if you decide to make one – I’d love to see what you come up with! And if you enter it into this week's Use What You Have Challenge, you can even win something sweet!!


Also... our October release is coming soon!! Make sure you join our event on Facebook so you can add it to your calendar!! It's going to be a great release, and I can't wait to show you what I've done with the AMAZING new stamp sets!!

Pin It

Aug 20, 2013

Sweet Tooth Tuesday - Gelatos


It's that time again! Danielle Pandeline here with another video for you.  This time I am tacking Gelatos! When these creamy chap stick things came out I wasn't sure what to think. But, I have learned to LOVE them by just PLAYING! Sometimes you have to just play with a medium to get to know it. It's fun to get messy and covered in colors to come out with an AMAZING result! I know you know what I'm talking about!

Here is my card that I made using Gelatos, Stencil, Paint Brush and some Sweet Stamp Shop Stamps.  The background is used by smearing the Gelatos across the background in an Ombre patterned, then spritzed with water and go back and forth with your paint brush. EASY PEASY right?  Then to make the silver circles, I took the stencil and rubbed the Gelatos over the area I wanted. Took a baby wipe ( A stampers best friend!) and smooshed the silver Gelato around in circles. Peel up the stencil and VIOLA! Instant texture. Now, be sure to let the Gelato dry over night! Remember it is a soft creamy medium, it will dry with time.


 I used Spin Me and Alpha Tabs to create this BRIGHT, FUN and AMAZING card.

Let's Recap!
Materials Needed:
-Watercolor Paper
-Gelatos
-Stencil
-Sweet Stamp Shop Stamps
-Paint Brush
-Water

I hope you have enjoyed this tutorial as it is my last for Sweet Stamp Shop for the Summer Design Team.  I had a lot of fun this Summer creating fun videos and projects for all you SWEETIES to be inspired by,  If you liked what you see you can follow my blog here and my YouTube here for more inspiration. 

Be sure to leave me a comment on your experience with Gelatos! I would like to here the techniques you have, or if you enjoy them as much as I do. 

Happy Stampin!
~Danielle P.

A Few Sweet Reminders! 


The Use What You Have Challenge is SUPER fun! I know I have some buttons and brads that haven't seen daylight in a while!  Let's put that stuff to good use. 

If you have missed my past Sweet Tooth Tuesday videos you can find them here

Don't forget to Tweet about any project that you made on our Twitter Feed here


Pin It

Aug 6, 2013

Sweet Tooth Tuesdays - Metallic Foils


Danielle Pandeline here did you miss me?  I was off the hook last Tuesday and I know you are dying to see the latest video I have up my CRAFTY sleeve. Well, I am digging up an old technique that might have be lost and forgotten in the stamping world. FOILS! Yes, I said Foil.  I was just reintroduced of the technique and went digging through my stash and found my Foil Kit.  With the trend of the color Gold coming back in full force this technique is perfect and EASY to ad a bit of Gold or other metallic color to your project.


Let's Recap!
 You will need the following..
- Zig 2 Way Glue / Tombo Mono Multi / Quickie Glue (just one of these)
- Foil Sheets in any color
- Sweet Stamp Shop Stamps
- Project

Start by stamping your stamp where ever you want it.
Trace the image with your choice of the glue I mentioned.
Let the glue dry. It should be tacky to the touch, and DRY.
Lay your foil over the area and press around the raised glue with your finger.
Pull up the foil.
SURPRISE!!!
You now have a beautiful shiny metallic image.
If you see any missed spots that the foil didn't stick to, just place the foil down and rub again. You can do this to any missing spots.

Isn't this just a FUN, Old School Technique.  I know I totally forgot about, but now I am having a blast adding Metallic touches to all my projects.

Let me know what you think is the best image to Foil in the comments below!

Happy Stamping!
Danielle P.

Just a few Sweet Reminders!

The Use What You Have Challenge is still going on, this is a perfect time to show us this Old School technique you just learned. 

If you have missed the past Sweet Tooth Tuesday Videos you can find them all here at the Sweet Stamp Shop YouTube Channel.  There are a lot of good tutorials in there to pass along to your friends.

The New August Release is coming SOON! I know you will be Gobbling up the new stamps! Pin It