Showing posts with label Get Bloggin. Show all posts

Nov 23, 2013

Ribbon Carousel Hop - Get Bloggin' Wrap Up


*** Don't forget we're having our 'black friday' sale ALL WEEK LONG! That's right, Nicole and Jacob are out of the sweet headquarters - so, the little sweets will play! Use coupon code BFS40 for 40% off your total stamp order - quantities are limited and the sale is good for in stock stamps only! Spend $50 and you'll get a free stamp set (a 2x6 stamp set valued at $7.95) The sale is also good on the clearance stamp sets. YEP, those will go fast (they might be sold out already!) Head over to the shop to scoop up your SALE stamps!


Hello Sweet Peps - Nicole here! We're excited about a really COOL hop that our friends Ribbon Carousel are hosting (and they're including us - how nice!)

So, here's what you'll need to know - straight from Ribbon Carousels leading lady, Corinna

Hey everyone! We've got such a treat in store for you this weekend! To celebrate all of those beautiful Ribbon Carousels being used around the world (yes, we've shipped Carousels to 27 countries now!) to keep ribbon, twine, washi tapes and spooled items tidy, we'll be hopping around our amazing Crewmates blogs this weekend showing you all of the beautiful and creative ways that our designers use THEIR Ribbon Carousels!


Would you like to win your very own Ribbon Carousel? Here is what you need to do: Visit the Designer’s blogs that are participating in each day of the blog hop and comment on their posts as you go. One of the Crewmate’s Holiday blogs (from each hop day) will be randomly chosen as the ‘it’ blog and a winner will be picked using a random number generator from the comments left on that Crewmate’s Holiday Blog Hop post.

You will not know which blog has been chosen so the more Crewmate Blogs you comment on, the better your chances are of winning your very own Ribbon Carousel! The Blog Hop will be open until 11:59 PM Eastern Time Monday, November 25th with the winners being announced Tuesday morning on the Ribbon Carousel Blog.

Already have a Ribbon Carousel?  Share a photo of YOUR Ribbon Carousel on our FaceBook page OR email it to info@ribboncarousel.com, and we'll share it for you!  You'll be in special drawing  for your choice of a Ribbon Carousel or 4 packages of spools!


For those that want a Ribbon Carousel NOW! Mark your calendar! We'll be having our LOWEST SALE PRICE of the YEAR sale on the Ribbon Carousels and Spools beginning Wednesday, November 27 - Cyber-Monday, December 2!  No coupon code needed!  Just go to our store and enjoy some happy shopping!


Here are the participants for Day 2 of the Ribbon Carousel Holiday Blog Hop. Enjoy!


(and because I can make these sorts of decisions around this place - here's a peek at what's coming in our Sweet December Release - happening on the 5th! --- SO cute!! Right? You'll want in on this release!)


Hi Sweet Fan's! Its Dana here and its time for my last Get Bloggin' post here at Sweet Stamp Shop! :( I have had the most amazing 3 months working with Nicole, Danni and the Sweet Design Team! Thank you so much Nicole for letting me apart of this amazing group!! But not to worry, there is an amazing NEW Design Team lined up for all your inspiration needs!!

So in this post i'm going to be doing a bit of a wrap up! Over the past couple months i have made all sorts of suggestions, tutorials or tips for making your blog better then ever. Here is a list of what i have covered so far!:

  • Get Bloggin' Photo's - This post goes into how i take my pictures, (during the summer, warm months!) along with some tips and a tutorial on how to edit pictures with GIMP (a free photo editing program).
  • Get Bloggin' Blog Banner's and Layout - This post gives some information on making or purchasing a blog banner. It also gives some tips on good blog design along with some blog designers in case you are not a do it yourselfer!! 
  • Get Bloggin' Blog Content Tips & Tricks - This covered the content, what you write in your blog, you want to have a great post title and include keywords through out your post.
  • Get Bloggin' Pinterest - This post covers watermarking your photos, adding a description to your photos, plus adding some nifty Pinterest buttons to your posts and blog.
  • Get Bloggin' Blog Housekeeping - This post covers cleaning up your categories list and how to back up your blog!
If you have missed any post feel free to check them out, or this post would be perfect to bookmark with all the posts in one place, for future reference! :)

Ok so your taking the time to make your blog the best it can be, but how do you know your hard work is working? Its all in the stats or the statistical data for your blog. (If you are using a blogging platform other then blogger, you can find similar information mention in this post, by searching your platform and terms in the post) Blogger gives some basic stats, that i am sure if you are like me, you check them out at least once a day! :)

But you can go further and get lots more useful information. So about October i tried 3 different and free blog analytical data services. Google Analytics, Site Meter and Going Up. I encourage you to give them all a try, however for me personally i liked Google Analytics the best. 

So i'm going to give some brief features of Google Analytics below. The key things that will most effect your Google Analytics are the keywords you use in your posts, post titles and photo descriptions.

You have to have a Google account and sign up for Google Analytics, then add some code to your blog. You can click here for some help on how to get started.

Just some of the information you can get out of Google Analytics:
  • Compare - You can compare any two periods of time against each other. This can include days, weeks, months and even years. You can see if your blog has grown in visits and clicks.
  • Visits - Google Analytics tracks visits to your blog, you can see who are unique visitors or who are returning visitors.
  • Traffic - This has so much info! You can see were the website that people come from (other blogs, google, direct etc.) You can then see within those numbers who are new visitors, how many pages they visited, and how long they stayed on your blog!
  • Keywords - Click on Organic and you can see what people are using when they search and find your blog. You can see what words people are finding you with and are they matching up with the keywords your using in your blog posts!
  • Search Engine Optimization (SEO) - This is the number of times a page(s) have appeared in google when someone searched for something. It also tells you how many times someone clicked on YOUR page from the results! How cool is that!! 
The above is just some of the information you can get out of Google Analytics! Once you have a few days worth of data you can start seeing what is happening with your blog and you can see even more after a couple months. Here is a screen shot of my Google Analytics for my blog Kraft Paper Stamps. It is comparing October (blue) with November (Orange).


This one below is for all Traffic. Obviously November isn't over with yet, but so far my Traffic in November is better then October!


This graph below is for my SEO (number of times my blog pages have appeared in Google searches).


So as you can see you can get some interesting data! You can use this to see if the updates, keywords, and design changes are making any impact!! Do you use a different blog analytics services?  Leave a comment, i'd love to know what it is and how you like it!!

I hope you have enjoyed this Get Bloggin' series as much as i have! It's been so fun and an honor to spend a little time with you and i hope you have learned at least a little bit in the past 3 months!! 

------------------------------------------------
Before i go i just want to share a super quick card!! Its a great way to use up some Washi Tape!! Click here to check out the detail on my blog.

Sweet Stamp Shop - Designer Dana Warren

Sweet Stamp Shop - Monogram It

I hope everyone has a wonderful day!! Take care!!

Dana


Pin It

Nov 7, 2013

Get Bloggin' - Blog Housekeeping

Hello Sweet Fans!!

Its Dana here with another addition of Get Bloggin'. The topic today is Housekeeping, just a couple tutorials and a super important tip that you might not have thought about!

Ok so to get started lets talk about Categories! I started my blog back in 2011 and other then tagging each post with a label or making a new one, i never really looked at the Category list on my blog. However that changed last week when i was trying to correct some sidebar photo's. I noticed that i really didn't need a couple categories, in fact when i counted them i had 84!! Yes, 84 different categories, that's a lot!!

Having good and accurate categories helps your blogging guests find your stuff easy! So i made the following tutorial on how to clean up your categories for Blogger. if you have another blog like WordPress, do a quick google search for category clean up and your blog type.

The first thing i did was make a list of how i wanted to sort my posts, and for me i decided to have Holidays (Christmas, Valentine, Halloween, etc.), Manufactures (Sweet Stamp Shop, Hampton Art, Papertrey Ink, etc.) and last a Theme list (Love, Birthday, Masculine, Fall, Mothers Day, etc.)

Then i looked at all my categories, one by one and made a list of categories that i didn't need anymore, or didn't fit in my lists above. For example in the screen shot below you can see that i have a category for Bird and Bird Ornament. The Bird Ornament post can be under the Bird category and still be found easily.


Ok so to delete and change the labels go into your Blogger Dashboard and click on Posts on the left hand side. Then you are going to click on the All Labels button and scroll down to the label you don't want, in this example below that is the Love Papertrey Ink category.


Next you are going to click on the box next to the post you want to ADD a label to it. I found its easier to add a post to a label first, then delete the label you don't want.


Then you are going to click on the drop down menu next to the tag icon. Then click on the category you want to label the post with, in this case the Love category.


Then click on the drop down menu again and choose the category you want to remove, in this case it is the Love Papertrey Ink category.


And now you can see that the post has disappeared, it no longer falls under the label Love Papertrey Ink.


----------------------------------------------------------

Ok another area of your blog that might need a little Housekeeping is your profile. If you are like me, i typed up my intro up once and never thought about it again! As i've mentioned before in a past Get Bloggin' post i don't like to write, and i really don;'like to write about myself, but with updated categories, i figured its time for an update!

Here is what i had before, not the greatest, i know! :)


This is after:


Along with updating your profile introduction, check your email, location and privacy settings. Make sure they are all up to date!

-------------------------------------------------------

And the last Housekeeping tip i have for you is backing up your blog!! Didn't know you could or would need to do this right?!? I was pretty clueless to, but this is such a good idea, i can't believe i haven;t thought about it before! I'm going to show you how to do this with Blogger, if you have something other then Blogger, just Google it and 'back up your blog' there are sure to be tutorials out there!

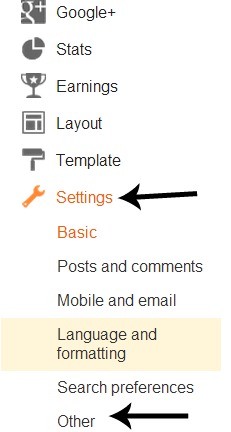
First go to your dashboard, and click on Settings, its the last option on the left. Then click Other.


Next you are going to click on Export Blog. Up pops up a Other > Export Blog Window. 


Click on Download. For me it downloaded the file to my 'Download' File on my computer. I then moved it to my external drive and then deleted it from my Download file. It might vary on your computer, but you want to keep it in a safe place! (BONUS - if your download goes to a Download file too, but you don't want it to, i have a bonus tutorial below on how to change the download destination!)


That covers your content, now we will back up your blog template or design.

In your dashboard click on Template, then click on the Backup/Restore button (top right). This brings up a new window.


Next click on the Download Full Template button. Again for me it downloaded it to my 'Download' file and i moved it to my external drive.


Ok and the last think we want to back up is your photos! First while logged into your Google account, go to Picasa Web Albums, were you will see your photos. Next sign in to Google Takeout and check the Google Pics and for the heck of it check Blogger too (not sure what this blogger all entails, but hopefully you'll never have to use it, but it will be there just in case!) 


Next click on Archive button at the top, now Google will create an archive file for you.

When its done, click on the download button and save it in a safe place.


----------------------------------------------
BONUS!! While i was waiting for my Google Takeout file to download i found in Chrome where i can change the download location!! So if you happen to have Chrome and don't like where your downloads go, follow this BONUS tutorial!!

At the far right (in Chrome) just under the X is a 3 line button. Click it and a drop down menu appears, click on settings. At the very bottom click the advanced settings link. Then scroll down until you find the Downloads section (pictured below). You can either give it a particular destination to download to or check the box to be asked where to save files before downloading.


------------------------------------------------

Are you still with me ?!? :) I would recommend downloading your template once, then only backing it up IF you make any changes to it. For your blog and photos i would suggest backing up at least once a week! That way all your hard work is not wasted if something should happen! 

I hope you will give these tips a try, please let me know how you do! And leave a comment if you have any other suggestions for some Blog Housekeeping!

I'm going to leave you with a quick Christmas card! For the details you can visit my blog here!


---------------------------------------------

In case you missed the BIG Sweet Stamp Shop announcement, click here to check it out! I DON'T want to miss it either!!

Oh and next week is the new release, you really don;t want to miss that!!!!!

Stay sweet, i'll see you next time!

Dana Pin It

Oct 25, 2013

Get Bloggin' - Pinterest

Hello Sweet Friends!!

It's Dana here with a new Get Bloggin' post! Today i'm going to be talking about Pinterest!! Yep that's right, Pinterest! Pinterest has amazing photos, tutorials, how to's, stamps, papers, fancy shoes, wedding dress... i mean anything and everything!! Its a great marketing tool for YOU and your Blog!!!  And its a great place to spread your love of card making, market yourself and the products you use, especially if you are on a design team!

First thing if you need to think about is a watermark for your photos! So when your photo gets pinned anyone can find where the photo came from! Making one is really simple! Just Google the name of your photo editing program and 'making a watermark', there are a ton of tutorials out there!! I made one not too long ago, but it's a little bit hard to read, so i'm currently trying out different fonts! Play with it and have fun!

But when you find one you like, you can use Pic Monkey to add them to your photo! Its super easy!

  1. Go to pickmonkey.com and click on Edit a Photo
  2. Open the photo you want the watermark on.
  3. Next on the left side of the screen click on Overlay button (the butterfly)
  4. Click the button Your Own
  5. Find your watermark file and click ok
  6. Now your watermark is open over your picture. You can resize it and move it around were you want it
  7. Then save the file to your computer!
Easy huh?! Now no matter who pin's your photos, anyone can find you!

---------------------------------------------------------------------

Ok another little tidbit for you! You know when you pin a photo there is an area for a description:

Sweet Stamp Shop - Get Bloggin

Well if someone pins your photo they could leave it blank, or they could insert some kind of description. It could be any type of description, they might not say anything about you or your blog, so here's a mini tutorial on how to have a description already there when a photo is pinned.

All you have to do is add a description to your photo in Blogger, its easy!!(if you don;t have Blogger, Google 'photo description Type Pad, Word Press' etc, though it might be very similar to Blogger, so give it a try first)

     1. Insert your photo like normal into your post
     2. Click on the photo and you will get a long window, click on the Properties linkSweet Stamp Shop - Get Bloggin

    3. An Image Properties window pops up. There are two text boxes and you can see where i entered some information about my photo. Click ok.
Sweet Stamp Shop - Get Bloggin

   4. Now just place your mouse over the picture and up pops a text box with the information i added to the text boxes (give it a try with the photo below, or any on this post!)

Sweet Stamp Shop - Get Bloggin

When this photo is pinned the information i added in the text boxes will appear in the pin description box.

Sweet Stamp Shop - Pinterest Description


You can add any type of description that you'd like. Just make it relevant to the photo! This added information does a few things for you. It helps you market yourself, by already having your name and blog name in the description field. Obviously people can edit it, but in most cases this will not happen.

If you place the name of the main manufacture featured on your project (in this case Sweet Stamp Shop!), this not only helps SSS marketing, but it also gives another keyword that your work will show up under! Unless you are one of the many well known names in the card making world, not a lot of people will be searching for you by your name. However lots of people are going to be searching for Sweet Stamp Shop and other manufactures. Its great exposure for you to have your card or project show up in someone's SSS search and this means more traffic to your blog!

--------------------------------------------------------------------

Ok so now you are ready for tons of people to start pinning your awesome, amazing photos!! But how do they pin it!?!?! Well some people have already added a quick button to their Internet Explore, Chrome, Firefox etc, and they use it all the time! But just in case someone comes along and doesn;t have the button you can have a button ready for them to use.

Nicole found a great tutorial from Code It Pretty on how to had a Pin button to your photos, Click here to check out the tutorial! I highly encourage you to give it a try!!

Sweet Stamp Shop - Get Bloggin - Code I Pretty

----------------------------------------------------------

Last i want to mention that you can add a follow you button to your blog! People who like your blog, just might light what you pin too!

Pinterest has a couple buttons and widgets that you can add to your blog. Click here to visit the page. Just add your Pinterest URL and type in a name, then click Build It. Pinterest will give you some code that you can add to your blog! Here is what mine looks like:

Sweet Stamp Shop - Get Bloggin - Kraft Paper Stamps

Another option is to add social media buttons! I haven't decided on the buttons i want to use yet, so the Follow Me button is great until i make that decision. There are a LOT of free buttons out there or you can get ones that go with your blog design (usually for an additional cost.)

--------------------------------------------------------

So i hope these tips help you use your Blog AND Pinterest better! All these tricks are great ways to make your blog easier to use, help market you and hopefully get more people checking out your blog and cards!! Is there another way you use Pinterest to market you and your blog? If you have any other tips, leave a comment!! I know everyone would love to know (me included)!!!

Here is a full shot of the card i used in my tutorials and the Sweet Stamp Shop stamp sets i used to create it!! Check out my blog for the details on how i made this card!!!

Designed by Dana Warren - Kraft Paper Stamps - Sweet Stamp Shop


Sweet Stamp Shop - Frank

Sweet Stamp Shop - Zombies

-----------------------------------------------------------------

Oh and don;t forget Sweet Stamp Shops Use What You Have Challenge!! The challenge is open until Tuesday October 29th, and there is a prize!!! Check it out here!

Sweet Stamp Shop - Use What You Have Challenge

I almost forgot!! Sweet Stamp Ship is having a Design Team Call!! Yeah!! You're going to try out right!?!?! You better!! Click here for all the details!!

Sweet Stamp Shop - Design Team Call

Have a Sweet Day!!!

Dana Pin It

Oct 4, 2013

Get Bloggin' - Blog Content Tips and Tricks


WORLD CARD MAKING DAY (**weekend**) is HERE!! 

- Eh, it's just an excuse to have awesome sales and make lots of cards! --- But, we'll take it! 

Speaking of sales ... wanna know what's going on with Sweet Stamp Shop this weekend only.... enter large booming noise.... 

20% off the WHOLE SHOP! (yep, even clearance and the new flair) 

SALE IS GOOD UNTIL MID-NIGHT SUNDAY! 

We're UNLOCKING THE VAULT! 


Yep, We've got a STASH of retired - AWESOME - stamp sets (yep, you see a 'Sweet Tooth' and a 'Sweet Victoria' in there!) And, we're giving them away for FREE!! ---- Here's the details...

READ CAREFULLY SO YOU QUALIFY!!

Spend $15 (after the 20% discount) and get one free 3x4 retired set for FREE.

The set is chosen by Sweet Stamp Shop - and is limited to stock on hand. 


YOU MUST ADD THE $15 'WORLD CARD MAKING DAY' TO YOUR CART TO GET THE FREE SET!! YOU MUST HAVE SPENT $15 BEFORE TAX (and AFTER THE DISCOUNT) TO EARN THE FREE SET! ** this helps us keep track of inventory ---- if you can't add this to your cart ---- we're SOLD OUT. 


Spend $25 (after the 20% discount) and get one free 4x6 retired set for FREE. 

The set is chosen by Sweet Stamp Shop - and is limited to stock on hand. 


YOU MUST ADD THE $25 'WORLD CARD MAKING DAY' TO YOUR CART TO GET THE FREE SET!! YOU MUST HAVE SPENT $25 BEFORE TAX (and AFTER THE DISCOUNT) TO EARN THE FREE SET! ** this helps us keep track of inventory ---- if you can't add this to your cart ---- we're SOLD OUT. 

www.sweetstampshop.com

________________________________


Hello Sweet Stamp Fans!!

Its Dana here with another dose of Get Bloggin' on the Sweet Stamp Shop blog!! Today i am going to cover Blog Content Tips & Tricks. Just to recap so far in the Get Bloggin' series: a few weeks ago a tutorial on taking good Photo's, here and last week blog tips for Banners and Layout/Design, here.

Most blogs have some sort of content or the words/dialog of each post. Some bloggers have long wordy posts and some only have a few words with mostly photos. Card Making blogs are somewhere in between. The point of a Card Making blog is to share your card, techniques, supplies and connect with other card makers.

How much you want to 'talk' is up to you! If you haven't started a blog yet i highly suggest you read a ton of card making blogs. This will help you know whats out there! Find a few that you like and when you start blogging, blog similar to those styles.

When i started blogging i noticed that not everyone would say how they made their card, so that's what i did when i started and its a good way to start. It made since to me as i'm not a creative writer at all, in fact i really hate to write!! Its true!! I'm Dyslexic so math and writing are torture! Torture!!! (luckily blog writing isn't torture for me anymore, however i have 4 questions that i have to write one page answers each in my Genetics class by next week and that IS torture!! LOL) It took me a while to start blogging because of this. But i finally took the plunge in 2011 (whoa!) and i am really glad i did. I think my technical writing is better for it! (yep blogging is considered technical writing, according to my Technical Writing II instructor!!) It helps that when writing a blog you are not writing some flowery, well explained, with lots of detail content! (unless your blog is a creative writing blog.... which thank goodness this is not! LOL)

Luckily blogging as a form of technical writing dosen;t follow the same strict rules as creative writing! (Phew! What a relief, right!?!?) Now we still want to have correct grammar and have sentences that make since, but the content is like a conversation, rather then some stuffy written article!

Ok so now i hopefully convinced you to start bloggin' (if i can do it, YOU can do it!!!) OR if you are already blogging you can use some of these tips below for your blog!
  • #1 Most Important Tip - Be Yourself!! - As i mentioned above find blogs you like and use them as a basis for you to start, the longer you do it the more comfortable you will become and your own style and personality will come out in your blog!
  • Consistent Layout of Content - This is how you have your paragraphs,  are they justified, do you use headings, what about bold/italics, caps (don't yell to much! lol), color etc! Its not set in stone, just don't be changing it every other post! 
    • Below is a screen shot of a piece of Lea Lawson's blog. Her blog post includes some info on the supplies she used, the challenges she is entering along with an actual list of instructions! Most people write the instructions in paragraphs form, but its definitely not required!! Do what makes since to you!
  • Keep Personal Info to a Minimum - The main reason a person is reading your blog is because they are interested in your card or crafty project and learning or getting inspiration from them. They do not want to read post after post about your family with an occasional card.
    • This is not to say you can't include the occasional personal info, or a brief 'here's what i've been up to, now here's my card' This is what i do, cuz i'm not a flowery, creative writing person, so i keep to the facts!! :)  You can even have an occasional personal only post! Most ladies and gents out there WANT to learn stuff about you! Blogging is a great way to make friends and card making is bring us together, so the personal info makes you more then just a person sitting there talking about some cards! Just don't overwhelm your audience!
  • Blog Title, Make it Count! - In my research i'm finding several ways you can tweak your blog to get more views and comments. (i'll be sharing those in late November, i'm going to be testing them out this month). But one that fits in here is writing a good blog title.
    • Keywords at the beginning of the title is best.
    • Think of how you would search for that card in Google. 
      • Style, subject matter (holiday, birthday, thank you), manufacture, technique used, etc
    • Use these keywords in the post it self, especially in the beginning. Try to repeat the keywords up to 3 times, Google uses these words to confirm what the page is about.
    • Google uses the title and the first 160 characters to display in a search. They also use this info when some one does a search and by having those keywords at the top and in the title you have a good chance of having your post come up on the first page of a Google search.
    • Here is an example:

You picked the first one right? It has the stamp manufacture that i used (SSS of course!) on my card AND it has the technique that i used on my card. So if some one searches for the die cut embossing technique, hopefully my post will be close to the top! The second title is what i would have named the post before i found out about this bit of info!

----------------------------------------------

Well that was a lot of information! Are you still with me?!?!  LOL Please let me know what you think of these tips! Do you have any other tips about blog content? If so i'd love to here about it, just leave a comment!

I wanted to share a card with you before you go, using a cool embossing technique (mentioned above!)..... Click here to see the details of the card, and can you spot the keywords in my post??


 ----------------------------------------------------

And don't forget Use What You Have Challenge #18 going strong! It easy to participate, just submit your card using some pictured 'stash'!


Have a great day!!

Dana

Pin It

Sep 28, 2013

Get Bloggin' - Blog Banners and Layout

Hey everybody!!

It's time for another dose of Get Bloggin'!!! Today i'm going to be covering Banners and Layout/Design! In my opinion there are 4 big areas that make up a great blog: Photos, Banners, Layout/Design and Content, oh my!! :) In my previous Get Bloggin' post we covered how to take good photos and in the next month or so i'll be talking about what to do with those photos on your blog. But first i want to talk Banners & Layout/Design, got to have these so you have a place to put your photos!!

Banners are the first thing readers see when they get to your blog, so having a great banner is a must! So where do you get a banner?? Well there are a few options:
  • Make your own. - Making your own Banner can be fun and easy.... if your a graphic designer or have experience with photo's, graphics and fonts etc. :)  However that dosen;t mean you still can't make your own! Just use a photo (make sure to use a copyright free one, or your own picture!), a photo editing program and then add some text! You can google your editing program and find lots of free tutorials on how to make your own! Each blog platform has the specifics as to banner size.
Here is a picture of my own handmade banner! Not to bad, but not the most professional banner. I recently upgraded my banner and layout! (more details about that below)

  • Free Premade Banners. There are a lot out there, some good, some bad... But if you choose right, it can be a good asset to your blog!
  • Purchase a Premade or Custom Banner.There are a TON of designers out there on the web that have premade banners for sale OR they will make a custom one for you! Price will vary, but if you A. don;t have the skills to make your own or B. don't like any of the free ones, then buying one is the easiest to do!!
Ok now lets talk about Layout/Design!!! Banner's and Layout/Design go hand in hand! As you search for free, premade or custom banners you will find that you can get a package deal: a banner and a Layout for your blog. When i talk about layout i'm talking about the background, the colors you use, the font, graphics, number of columns etc.

When you set up your blog for the first time Blogger, Word Press, Type Pad all have tools to use their templates and customize it to your needs. This is a great place to start! And you can apply these tips below to your customizing! OR you can apply these to a Banner/Layout you either get free or purchase from a designer.

Ok now on to the important info!! LOL
  • Clean Background - White is best but you can have a pattern, minimal and light colored works best. Here is a perfect example of a busy (in a good way) background from another card maker Ashley Marcu.

  • Use easy to read Fonts - Nothing worse then not being able to read the post! So no super fancy fonts or colors!! 
  • Columns should align and keep graphics to a minimum! - If your graphics are all over the place, it will look messy and a reader might be turned off and not bother with your post!
    • You also don't need a ton of graphics! It dosen;t mean you can't display your awards, design teams, and favorite companies, but there isn;t a need to have a challenge badge from 5 years ago! Just create a page and have a running list of your accomplishments!! See my achievements page for an example!
  • Music - NOT a good idea!! NOT a good idea!! NOT a good idea!! No one likes it, probably 99% of people (my guess anyway! LOL) click to get off that blog fast!! No one likes having music suddenly blaring out of there speakers, especially if they happen to be at the library!! 
Similar to Banner's you can do your own Layout/Design, use free elements or purchase custom/premade designs. Not too long ago i purchased a blog layout from Designer Blogs. They have lots of premade Banner's and Layouts (that are reasonably priced) along with custom options! I hope one day to be able to have a custom design!

Here are a few more blog designers to check out!
Tricia Nae Designs
Tiffany Kuehl Designs
Lilipop Desings
Blogaholic Designs

Ok i think i've talked your ear off enough!! Ha Ha!! Next time i'll be covering Blog Content, then we will be getting down and dirty with some cool tips and tricks to make your blog even BETTER!!!

--------------------------------------------------

I don;t want to send you on your way with out a card using some Sweet Stamps!!! I made a easy to do CAS card with some post it's, ink, a stamp, and sequins! Visit my blog here to get all the details!!


---------------------------------------------------


Also don't forget about Use What You Have Challenge #17!! You have until Tuesday to enter and use up some of that STASH!!!

I hope you all have a great day!!

Dana
Pin It