Showing posts with label Michelle McClure. Show all posts

Oct 16, 2012

Tag, You're It


The Reveal
Hello sweet friends! This is Michelle here, and I'm so excited to share my project with you today. I made a set of sports themed masculine gift tags.

Sporty Gift Tags

The Stamp Set
Both tags feature the sweet stamp set Sports Fever. The sports equipment in the set are just so cute. It would be great on projects for coaches, athletes and sports lovers. 


The Details
When I was in the planning stages, I was thinking the recipients I had in mind might prefer a tag featuring their favorite sport or team, rather than a cutesy card. I decided to go with something simple and straightforward. For the base, I cut brown cardstock into a 3 x 5" rectangle and trimmed the top corners to make a tag. I also punched a hole at the top and added an eyelet. 

Golf Themed Gift Tag

The first tag I made was for my Dad. Since his favorite sport is golf, I decided to design it especially "fore" him. I used the hockey stick stamp and masked the puck. I also did a mirror stamping technique, to get the stick facing the opposite direction. Hopefully the result looked like two golf clubs. I also added a white brad that I drew on some dots using a Sharpie to simulate a golf ball. I printed out the matching sentiment from my computer. I chose colors that reminded me of a plaid pattern as he went to visit St. Andrews golf course in Scotland. 

University of Miami Gift Tag
The recipient of my second tag, is my brother-in-law, who is a fan of University of Miami's football team. If you haven't guessed, the school colors are orange and green. I wasn't sure which of my paper collections had the exact colors I needed, so I just used my scraps. I have my scraps in large Ziploc bags grouped by color. I grabbed the green bag and orange/red bag and found all the pieces I needed. I made the sentiment "Just for U" with the U paper pieced in the style of the team's logo. You can easily change up the colors or equipment to match your favorite team.

These were relatively quick and fun to make. Stamps and tags are a great combination, just like peanut butter and jelly.


If you like this stamp set, be sure to check out the Sports Fever board on Pinterest, or check out all the other boards for more inspiration.

Don't forget to enter the Sketch Challenge by midnight on Friday, October 19th.

Thanks so much for stoppin' by today!


Pin It

Oct 1, 2012

1 Stamp 3 Ways

SALE!!

Spend $20 and get the 4x6 set Haunted House FREE - while supplies last! --- Coupon Code HH01 


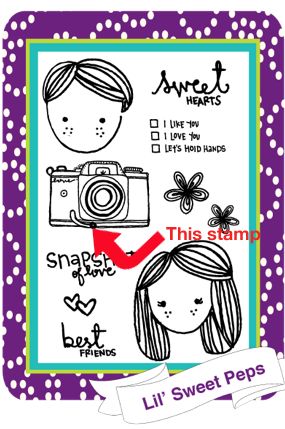
Lil' Sweet Peps stamp set

The Stamp Set
Hello sweet friends! This is Michelle here today and I will be working with the Lil' Sweet Peps stamp set. I decided to focus on just one stamp set, and within the stamp set to focus on just one stamp - the cute lil' camera. To show the versatility of Sweet Stamp Shop stamps, I wanted to use 1 stamp in 3 ways - on a card, layout and altered item.


The Card

For this card, I wanted to change up the perspective. Usually the recipient is looking at an image on a card, but this time the image is looking at the recipient. I stamped the girl and the camera, colored them in with Copics and popped the camera over the girl. I drew some fingers and wrapped it around the camera so it would look like the girl is taking a picture of the recipient. I used a strip of Tim Holtz film strip ribbon on the card. I wanted to put some mini pictures behind each frame, but didn't have a recipient in mind yet. They are the perfect size to house the mini contact photos that comes with pictures developed from a store. I had some May Arts ribbon with little squares on them that mimicked the edge of the film strip.


I wanted to change up the usual rectangular card shape so I went with a tag that opens up. I took a 6 x 6" paper from a mini-pack, folded it in half and hand trimmed the top. I made three cuts at the top for a quick and easy shape change. 

The Layout

This is actually the title page for my Smash Book album. I used the boy and girl stamps in place of the word "we" in my title. I used the two flower stamps for my embellishments. Since it is a title page, I wanted the stamps and words to be the focus, and not any of my photos. But I did want to give a foreshadowing of the contents so I hid 6 photos. Can you tell where?


I wanted to do something a bit different for the camera. I stamped, colored and attached it to a strip of 1 x 12" piece of patterned paper. 


I fan folded the strip to the width of the camera and ended up with 6 rectangles. I adhered one rectangle on one end to the camera and one rectangle on the other end to the layout. It folds up flat behind the camera, but pulls out to reveal 6 hidden photos. You can attach 12 photos if you use both sides of the strip. 

The Mini Album

I wanted to turn the camera stamp into a mini-album. But the stamp is around 1.5 x 2" so it would have been an actual mini mini-album if I used it as is, so I did come computer magic. 


I first stamped the camera from Sweet Lil' Peps onto cardstock and scanned it into my computer. I opened the image in Silhouette Design Studio and enlarged it to the size I wanted. I used the Trace button, outline only to make a cut around it. I pressed the Registration Mark button which will let the Cameo know where to cut exactly after you print out the picture. I also wanted some blank pages for the mini album so I placed 5 blank camera cuts on the page, only one is showing in the picture above. 


I sent the file to my printer, so the camera and registration marks are printed. I then placed the cardstock on my Cameo mat. It cuts out the printed image exactly on the lines! This would be great if you needed multiple images cut, like for a Christmas card. I watched this short video to figure out this process as this is my first print and cut project. 

I colored my camera with Copics and used an Epiphany bubble cap on the lens. I put a large eyelet in the corner and tied a length of suede lace through it for a camera strap. It turned out to be the size of my actual camera. 

The mini album opens like a fan from the eyelet and you can see the blank camera shaped pages inside. The best thing is, I didn't have to hand cut all the cameras pages. 

Just one little stamp is so fun and versatile to use. I hope you are inspired to use your sweet stamps on all your crafty projects.

As a caveat, I have to mention due to the hard work by the amazing designers of these stamps, please don't share any altered or copied artwork and cut files with others. Some stamp companies would prefer that their artwork be totally unaltered or copied. You can contact the manufacturer of the stamps you have purchased and check to see their personal use policies. If we protect their creative products then they can keep turning out more amazing tools for us to use.

Thanks so much for stoppin' by!

Pin It

Aug 23, 2012

New Sweet Challenge! Come join us!

Hello Crafters! 

Today is the day! Are you ready for our first Sweet Stamp shop weekly challenge?! It's Kelly here to introduce you to it :) I cannot even tell you guys how excited we are to be sharing this with you! So without further ado the first weekly challenge is  . . . .drum roll please . . .  


Paper Piecing! 
Sweet Stamp Shop stamps are perfect for so many things but oh to paper piece them :) Makes me happy! I would like to note that you DO NOT have to use Sweet Stamp Shop stamps in order to play along. we understand everyone has a different stash and sometimes a certain stamp is just *perfect* for the challenge. However we would love to see what you create with our stamps too :) You don't currently own any Sweet Stamp Shop Stamps?! *Shock and Awe* there may be a way for you to get one *wink* keep scrolling*

Are you ready to see some SWEET projects from the design team? I sure am!

Let's start with the super sweet illustrator herself, Nicole! Using Sweet Tart and Packaged Pretty 

The fabulous Misty using The 'Core' of It 


The amazing Jamie using Sweet Tart 

Little old me, Kelly, using Happy Bugs, Furry Friend Forever, and Melvin and Vernie 

Lastly, we have the fantastic Michelle using Sweet Tart

Aren't these girls unbelievable?! Seriously, their talent is off the charts :) You can visit each of our blogs by clicking on our names or our inspiration photo. Spread some Love!
So did you happen to notice that adorable Sweet Tart image?! Would you maybe like to use that adorable Sweet Tart image? 

Okay, you twisted my arm LOL! Because Nicole is so sweet and generous she is giving away a free digital stamp for the challenge! Just click on the Download link below the photo. Please be respectful of Nicole's design and use it to play along. Also, please check out the terms and conditions too. 


Besides her gorgeous inspiration project Michelle did something else amazing for you guys! She turned that digital stamp into a cut file! I know, right?! How super awesome is she? You can download the cut file from Michelle's personal blog. Thanks for being so SWEET Michelle! 

So we have inspiration, we have digital stamps, we have cut files, we have . . . rules . . .ack, I know, but we have to have some kind of game plan :)
The Rules
1. Create a new paper pieced project
2. You DO NOT have to use Sweet Stamp Shop Stamps to play along (although we would sure love to see 'em if you've got 'em!)
3. Upload your new project into our Flickr group and tag it with SSSweekone. 
4. You can enter the challenge a total of 3 times. Each entry must be a new project. 
5. You can combine your entry with up to 3 other challenges. 
6. Submit your project by Midnight Eastern Standard Time on Tuesday August 28th.

Now more fun stuff :) What can you win?
The Prizes
One random winner will be chosen to receive one in stock stamp set (in varying sizes). If you are an international winner you will have to pay shipping costs.
Every week we will select a Top 4 to feature. At the end of the month we will put together the Top 16 and giveaway a spot as a guest designer here on the blog! 

Are you guys as excited as I am? I can't wait to see all your wonderful projects streaming through our flickr group *squeeel* Need some more inspiration?! Okay good, because Ellen is here to share another paper pieced masterpiece with you! 

Take it away Ellen :) 


Hi Everyone! 

Ellen here with a little altered project for you today using the fun new Mermaid Stamp set called Under the Sea.

This is such a great set and can be used for a variety of projects. When I saw the seaweed,  I instantly thought of making my own flower.


I stamped the image in a variety of colors and then cut them out. Then I layered them and added a button and bow. 


Isn't that candle just gorgeous! and how creative is she? Seaweed flower? Completely beautiful! I hope you guys have been super inspired and will help us kick start this weekly challenge off fabulously! Don't forget to head over to the flickr group to upload your projects!

Hope you have a SWEET day!
Pin It

Aug 20, 2012

Watchin' TV Door Hanger

The Reveal
Hello sweet friends! This is Michelle here, and I'm so excited to share my project with you today. I made a double sided door hanger for my nephew's room.

Reversible Door Hanger

When he is home, he can place the front side up which states, "Isaiah is in!" His picture is placed inside  the super cute retro TV set from the Watchin' TV stamp set.

Front View

When he is away on business, he can flip to the reverse side of the door hanger which reads, "Isaiah is out!" I removed his picture, and stamped the static lines for when there is no programming. 

Rear View

The Stamp Set
Both stamps I used are from the Watchin' TV stamp set. I thought the TV looked liked a picture frame so I wanted to place a photo inside. 

Watchin' TV Stamp Set

I stamped the TV twice, once on a brown piece of paper to simulate a wooden TV set. I cut my photo to fit on the screen and adhered it. I stamped the TV again on a piece of blue patterned paper. I cut out the frame and adhered it on top of my photo. I also cut out the blue hearts for an added detail. I popped the finished TV onto my door hanger with foam tape for some dimension. 

TV Screen

The Inspiration
I started out fully intending to make a card, but the materials I had on hand dictated otherwise. My supplies are organized into kits, and the kit I chose to use for this project was from an October Afternoon mystery box I purchased. It contained a set of flash cards that I never used since the scale was too large for a card or as an embellishment for a layout. I reminded me of the size of a door hanger and hence this project was born. I make it a point to use all my supplies, even the ones that seem difficult, so I can justify my purchases.

Flashcards

If you would like to make your own door hanger and you don't have flashcards, you can cut a piece of chipboard, cereal box or heavy cardstock to a rectangle sized 8 x 3.5" and round the corners.

The Supplies
Stamp: Sweet Stamp Shop (Watchin' TV)
Cardstock: Bazzill Basics Paper
Pattern Papers: October Afternoon, Basic Grey
Flashcard: October Afternoon
Stickers: October Afternoon
Ink: Stampin' Up
Oval Punch: EK Success
Twine: Timeless Twine (Aqua Blue & White)
Miscellaneous: Button, Book Page

If you like this stamp set, be sure to check out the Watchin' TV board on Pinterest, or check out all the other boards for more inspiration.

Thanks so much for stoppin' by,
Michelle
Pin It